How to Draw Cool Tattoos on Paper
The tattoo is a grade of body modification where a specific design is marked onto the skin past inserting an ink through a needle.
Though we accept different opinions regarding tattoos, we can all agree that it's a creative work of fine art.
If you were to get a tattoo, what blueprint would you similar to have on your skin for the residuum of your life?
Perhaps you desire to make a quick sketch of your preferred design before actually going for it? You've come to the right place!
Fortunately, we have created a step-past-step tutorial on how to draw a tattoo, summed up in 9 quick and easy steps. Each instruction comes with an analogy to make the unabridged process a lot easier for yous!
What's fun near this tutorial is that you can customize the tattoo as much as yous like! You lot can handpick its colors besides!
Find out if y'all have what it takes to be a tattoo creative person with this comprehensive guide!
Have fun and apply your creative skills to describe a tattoo!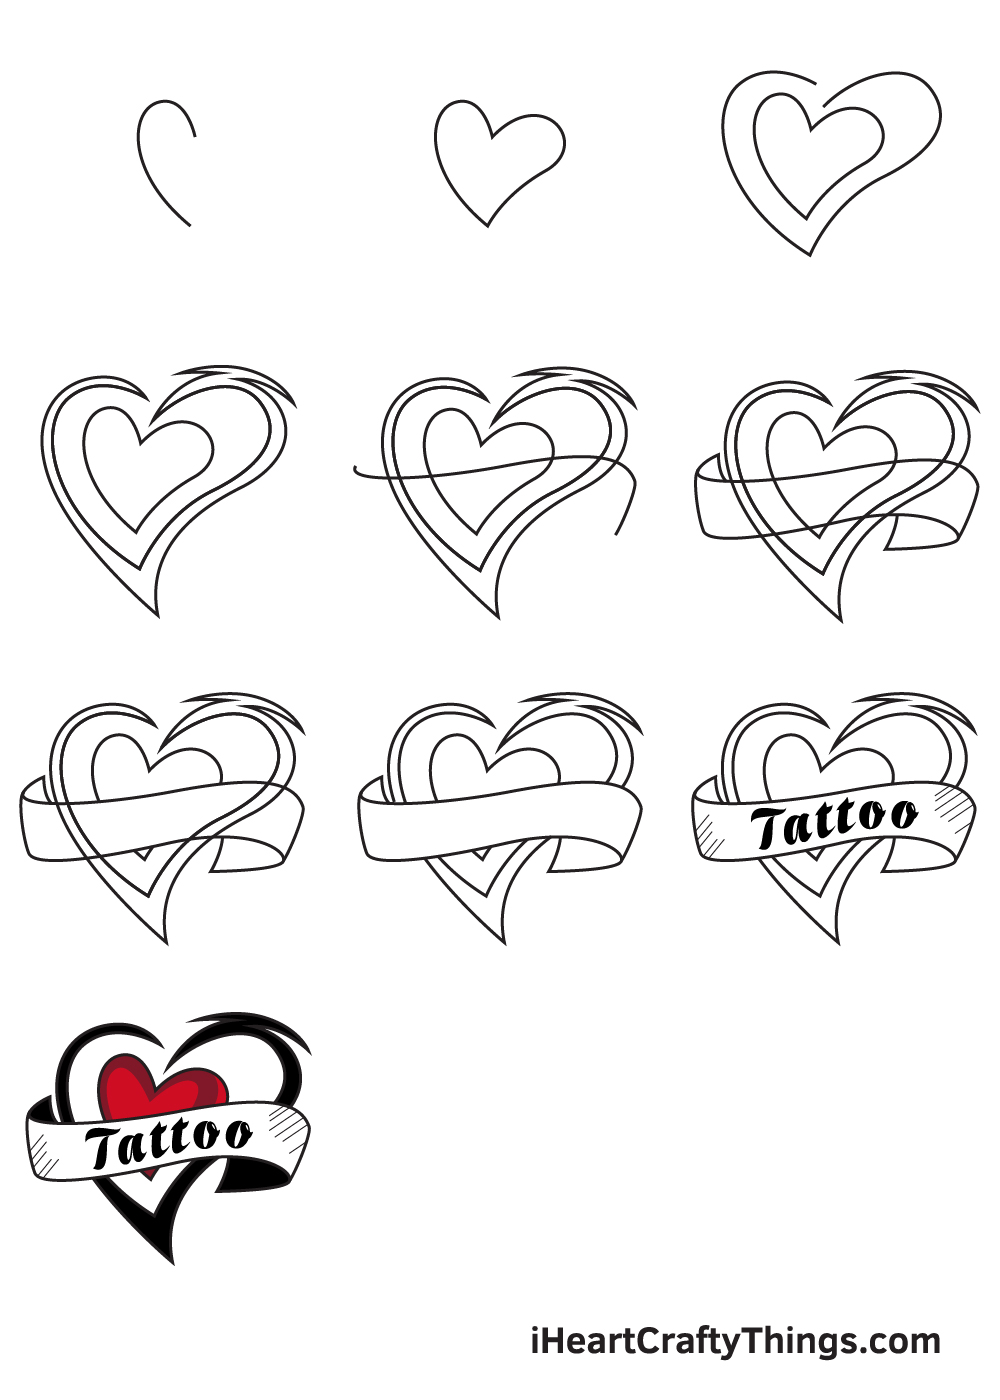
What'south in this Blog Post
- How to Draw a Tattoo — Let's get started!
- Step 1
- Step two — Draw the Center in the Middle of the Tattoo
- Step 3 — Next, Describe Another Layer of Heart Shape
- Step 4 — Afterward, Draw an Artistic Outer Heart Figure
- Step 5 — Next, First Creating the Overlay Banner
- Step vi — Now, Finalize the Imprint in Front of the Heart
- Pace vii — Later, Polish Up Your Tattoo Drawing
- Step viii — So, Create a Bare Canvas on the Banner
- Pace 9 — Write a Word on the Banner to Consummate the Tattoo
- Your Tattoo Drawing is Complete!
How to Draw a Tattoo — Let's get started!
Stride 1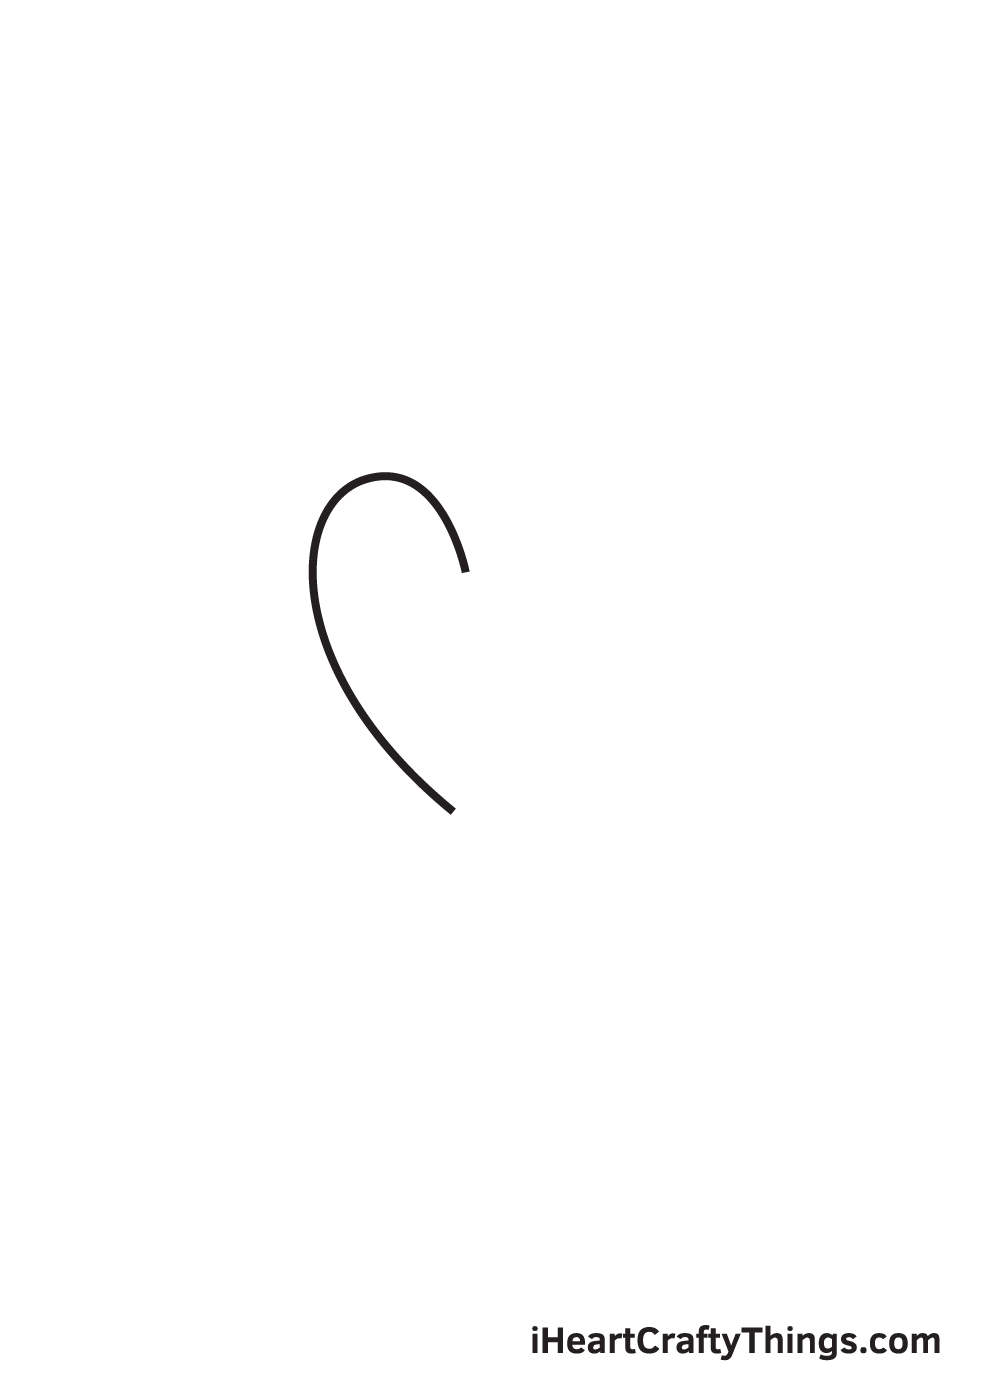
Begin past cartoon a curved line forming a hook. This creates the half of the middle shape on the left side.
Make sure that the center shape will be drawn in the center by creating reference lines. Only draw an intersecting horizontal and vertical line across your paper.
The left side of the vertical line marks the spot where you should draw the half of the heart shape.
Footstep ii — Draw the Heart in the Middle of the Tattoo
Draw another line with a similar course straight connected to the one we previously drew. This creates the other half of the heart, thus completing the commencement eye in your drawing.
When drawn correctly, this should form a curvy centre effigy.
Step 3 — Next, Draw Another Layer of Heart Shape
Depict another heart shape enclosing the first heart we drew in the previous step. Every bit you tin meet in the illustration, this heart shape must exist relatively bigger than the previous one.
At this point, you should now exist seeing a large heart shape with a smaller center shape within.
Step iv — Afterwards, Draw an Creative Outer Middle Effigy
Depict another center-shaped figure enclosing the center we drew in the previous steps. This time, even so, this middle shape should have a singled-out pattern unlike the previous hearts nosotros drew.
Feel complimentary to utilise the illustration every bit a guide to brand sure you're doing it right!
Draw a curved horizontal line beyond the eye-shaped effigy.
This forms the top edge of the imprint in front of the middle.
Proceed past cartoon some other line at the bottom of the previous line we drew. This forms the bottom edge of the banner.
Afterwards, depict a vertical line on each side to connect both endpoints of the superlative and bottom edge. This completes the construction of the overlay banner.
Step 7 — After, Shine Up Your Tattoo Drawing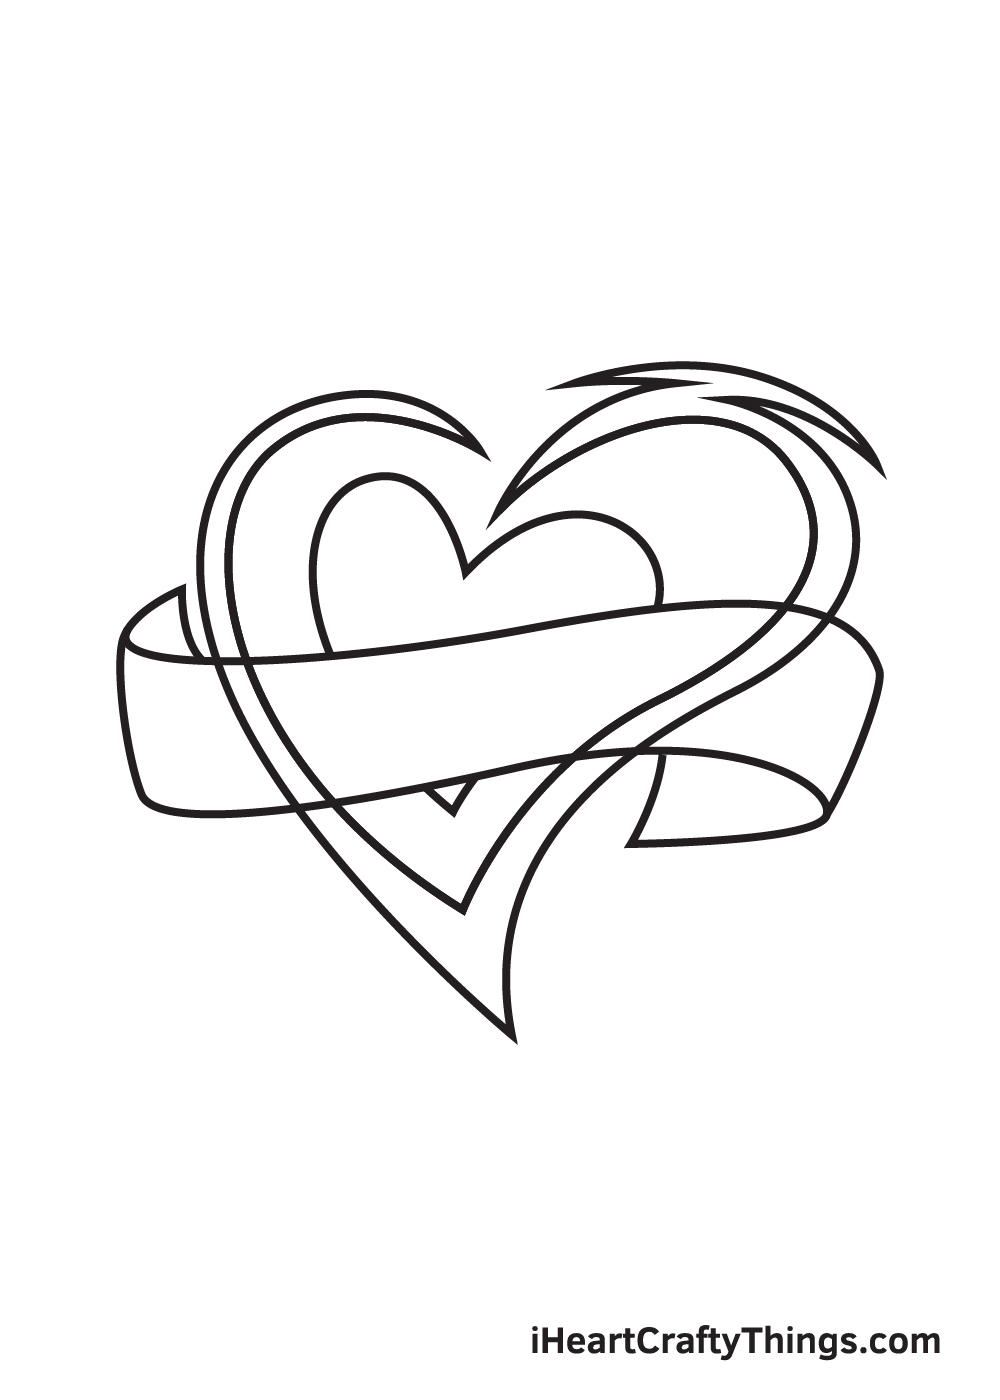
Refine your drawing by getting rid the lines of the inner middle that overlaps inside the banner using an eraser.
Similar to the previous footstep, erase the lines of the outer heart figures that overlap inside the imprint. At this signal, the space within the banner should at present exist blank.
The banner should have a clear sail or space, because nosotros'll be writing on it later on.
Every bit you can see in the illustration above, we've merely written the word "Tattoo" on the canvas of the imprint.
You can opt to write the same word or you can write something else like dear, peace, or whatsoever word you adopt! You tin fifty-fifty write your name if you like!
In that location yous have it—you take successfully drawn a tattoo! Now, it'south finally time for the part we've all been waiting for, which is choosing the colors and coloring the tattoo!
The colors y'all will be using for the tattoo is entirely upward to you! Nosotros suggest using more than one color to make the tattoo vibrant and colorful!
Have fun playing with colors until the tattoo ultimately comes to life!
Your Tattoo Cartoon is Complete!
Hopefully, yous had fun with this step-by-step tattoo drawing tutorial. Now that you tin describe a tattoo, perhaps you lot tin can draw a character with a tattoo marked on his or her body adjacent?
Check out our tutorial on how to draw a male child or a girl to make it happen!
Remember, all of our drawing tutorials are 100% complimentary for yous to utilise every bit learning materials for your drawing activities.
We are regularly updating our "How to Describe" catalog, so don't forget to keep re-visiting our website so you can continuously relish all-new drawing tutorials.
Once you're done drawing and coloring the tattoo, make sure to evidence off your masterpiece! Take a photo of your artwork and share it on our Facebook page and on Pinterest.
Don't be embarrassed! Y'all've worked difficult for it and so nosotros're sure information technology looks impressive!
Nosotros tin't look to see your cool tattoo cartoon!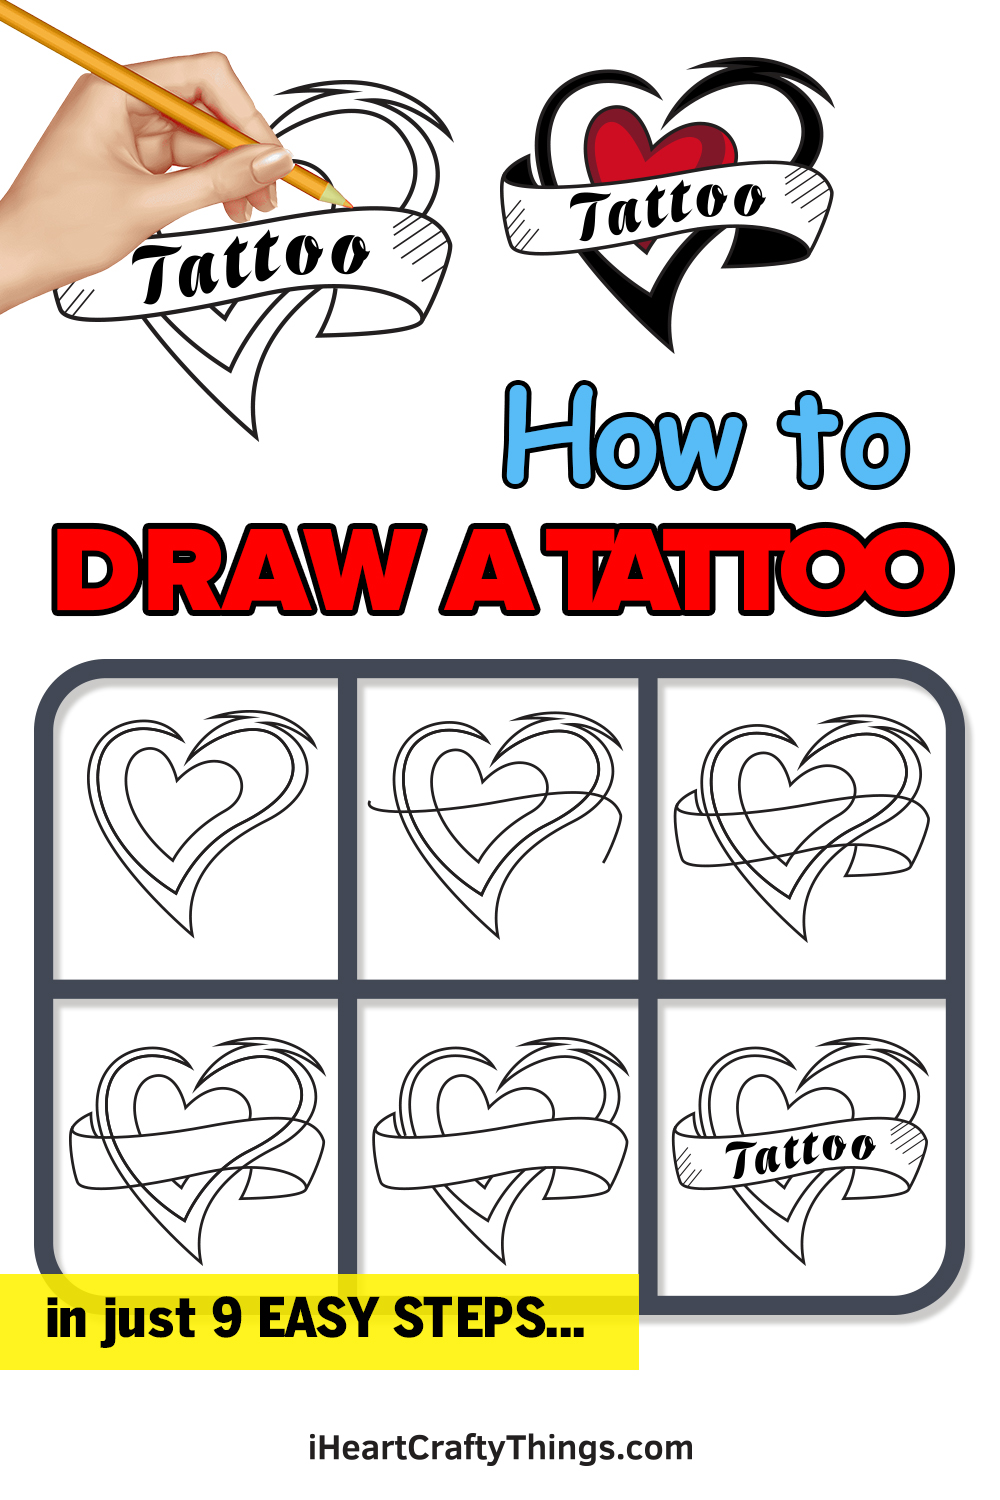
Source: https://iheartcraftythings.com/tattoo-drawing.html